

OK time for the big boy stuff. You got your Retroid in the mail and youre ready to show it off on Instagram, BUT you dont have anything on it yet! Let's make people jealous. Go ahead and cue up those videos you were supposed to save. Theyre embedded below too, but it's really best to have two windows open. and youre gonna pause a LOT, so uh.. be ready for that.
Like I said earlier Im going with the Pocket 2+ Guide from Retro Game Corps as my basis, since it is the most comprehensive version. I cant possibly rewrite everything this video guide covers, but im going to break it up into sections and try to go over what you need to pay careful attention to, and which parts are optional, and generally just include anything i wish i had the first time around.
DESCRIPTION GUIDE
 | important to gameplay |
 | critically important; may not function properly if youre not careful |
 | optional step |
 | update since video release |
 | alternative settings i use/recommend |
YT Link: youtu.be/koUzJWWqScY

BASIC DEVICE SETUP
2:10
Basic SettingsTurn On
- Set Language
- Set Wifi
- Set Timezone
- Enable Google Play services
- SKIP Pre install apps (we're going to update them before installing in the next step)
- Select BOTTOM Laucher (ADSP)
3:30
System Updates
Settings
 System
  Updater
Repeat until no updates left.
 his starts at 1.0.0.5, and updates to 1.0.0.8
mine shipped at 1.0.0.8, and had one update available to 1.0.0.9
Return to Setup Wizard
Settings
Handheld
Advanced
 Re-enter Set Up Wizard
Select Preinstall ALL apps
Retroid now ships with 30 pre-installable apps; there are only 14 in the Starter Guide video. I haven't used more than half of them, and ended up deleting quite a few. You can choose to install all of them, or look through this list of app descriptions first.
Select TOP Launcher (Retroid); or press the icon shown below to follow along if you are still in the ADSP launcher
Your Retroid comes with 2 launchers, and you can add more if you like.
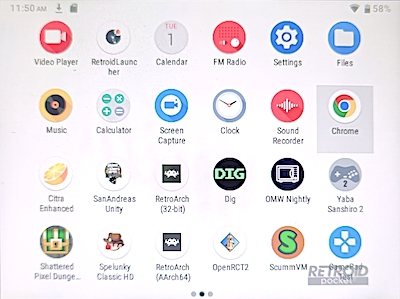
The ADSP launcher features all the stuff on your Retroid, and has small circle icons.
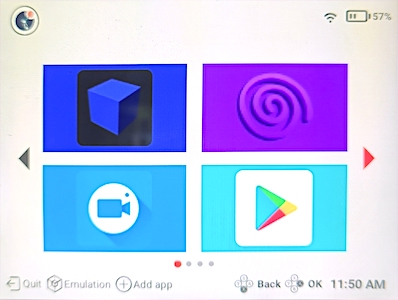
The Retroid launcher lives inside the ADSP one, and you can place all your gaming related apps inside this one. Kind of like a shortcut. It displays icons in big rectangles.
RetroArch 64 is the powerhouse of the cell. Its basically the settings for most, if not all, of your cores and roms, and it takes a while to set up.
Mine looks a little bit different because I customized it.
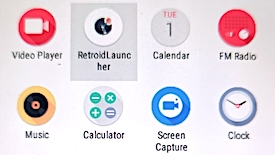
To Open the Retroid Launcher from the ADSP Launcher press this icon.

4:50
Adding Apps to Retroid Launcher
Open Retroid Launcher Press 'Add App' at the bottom of the screen Click any apps you want to show up as tiles in your 2nd (Retroid) Launcher. App tiles will be shown in the order you add them. Here are the apps I recommend:
| Gaming Apps | System Apps |
|---|---|
| RetroArch (AArch64)* | Google Play |
| Redream | Google Chrome |
| Flycast | Settings** |
| Dolphin | Gallery |
| M64Plus FZ | Files |
| AetherSX2 | Screencapture |
| PPSSPP | |
| Duckstation |
Press 'Back' to return to Retroid Launcher and see the apps youve added
*There are two versions of RetroArch with the exact same icon, RetroArch 32-bit and Retro Arch AArch64. We are only going to use the Retro Arch 64 version, so only add the version with 64 in the title - this will avoid confusion during set up and the 32-bit one will still be there (accessible from ADSP) if you find an old console that requires it, which I have not.
** If you dont add this Settings tile, you can still access it by pressing 'Quit' in Retroid launcher. These are settings for the handheld itself, while settings for the gameplay will be in RetroArch.
5:36
Adding Apps from Google Play
Sign in with Google Play Account
click to add any apps you may want
if you only want to play old games this isnt necessary, and you can always add extra apps later
- DraStic is the only paid app you will need ($5USD), and thats only if you want to play Nintendo DS games
- Retroid now ships with AetherSX2 (PS2 core) so it should be pre-installed
7:00
Streaming Apps
If you just want a handheld to play older consoles you can skip these. While possible, streaming from Retroid isnt the best since the controls and processing power wont match those higher end games.
7:45
Android Games
again, if you only want to play older systems this wont be necessary, these section is for games you can already play on (and are optimized for) your phone.
8:50
Change Sleep SettingsSettings
Display Advanced SleepChoose 10- 30 min
8:46
Change Controls to Xbox Style Settings
Handheld Settings Input Controller StyleI dont know why you want to do this
9:19
Set Up MicroSD CardPop in card (metal side up/facing screen)
Settings
Portable Storage
Let it add folders, select 'disk' to view, then press back.
Safely Eject by pressing icon on left (next to 'disk')
ADDING BIOS AND GAMES
Its BIOS time baby! Hopefully youve gone and read the BIOS page in this guide and have decided what route youre gonna take.
9:48
Adding BIOS
Insert Disk
 Create 'Games' Folder Create 'BIOS' folder inside 'Games' folder Create 'PS2' folder inside 'BIOS'
Drag your PS2 Bios files inside:
SCPH-90001 Bios v18 USA 230 .DIFF
SCPH-90001 Bios v18 USA 230 .INF
SCPH-90001 Bios v18 USA 230 .MEC
SCPH-90001 Bios v18 USA 230 .NVM
SCPH-90001 Bios v18 USA 230 .ROM0
SCPH-90001 Bios v18 USA 230 .ROM1
If you followed the steps in my BIOS guide, you can drag the contents, with the two PS2 and DC subfolders containing the correct files, as is. But you should still double-check that these are what you have in the PS2 folder (if you want to play PS2, that is).
9:48
Adding GamesInsert Disk
Return to 'Games' Folder Create a foler for each console you want to play inside 'Games' folderdrag your ROM files for each console into its console folder13:34
GameCube Config files
Go to the Retro Handhelds Games Compatibility Spreadsheet
Click GameCube Click the tinyurl link in NotesDirect download link HERE
Unzip, and Add contents to your Gamecube folder, if you have one.
Eject microSD card when finished
Return microSD card to Retroid
CONFIGURING RETROARCH
15:18
Basic RetroArch Settings
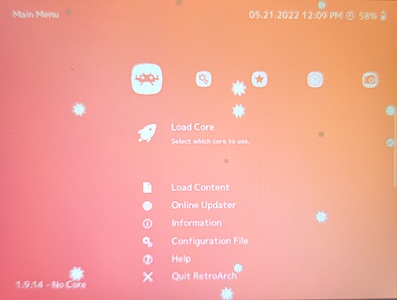
Open RetroArch-64
select AllowPress Right on D-Pad twice for Settings
Select Drivers Select Menu
 Select 'xmb'
Press back twice to get back to Main Menu
select Configuration File
Press B* or Back on D-Pad to to Return to the Main Menu
Select 'Quit RetroArch
ReOpen RetroArch-64
Press Right to go into 'Settings'(2nd Column)
select 'User Interface'
select 'Appearance'
Change to '1.5'
This zooms in the text, however some lines get cut off, this guy seems to have the entire menu memorized and its not a problem, but I have mine set to '1.33' so I can still read each menu option.
Press B or Back to get back to Main Menu (1st Column)
Select 'Configuration File'
Select 'Save Current Configuration'
 WE. ALWAYS. SAVE. OUR. CONFIGURATION! everytime you make changes to the RetroArch settings, they need to be saved here to take hold
NOTE: sometimes pressing back while in the Menu can cause you to change a setting, depending on whats selected, so always be careful, and try pressing B first, if that doesnt seem to work, and you seem stuck in a menu screen try pressing '1.9.14 Core' in the bottom left-hand corner, sometimes this works if your buttons arent properly configured.
16:41
Downloading Cores
Start at Main Menu (1st Column)
select 'Online Updater' select 'Core Downloader'Download the following cores:
Arcade (FinalBurn Neo)
Nintendo - Gameboy/Color (Gambatte)
Nintendo - Gameboy Advance (mGBA)
Nintendo - NES/Famicom (FCEUmm)
Nintendo - SNES/SFC (Snes9x Current)
Sega - MS/GG/MD/CD (Genesis Plus GX)
Sega - MS/GG/MD/CD/32X (PicoDrive)
Sony - PlayStation (PCSX ReARMed)
18:22
Video SetupGo into 'Settings' (2nd Column)
Select 'Video'no changes are made to Scaling
Select 'Video Filter'Select 'Normal2x.filt'
19:13
Controller Settings
Return to 'Settings'
Select 'Input' Select 'Port 1 Controls'Go through and select each control by pressing A, followed by the button referenced (B,X,Y,A etc)
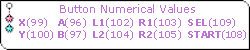
 This step is critically important and if it ever appears like your buttons arent responding, like B isnt allowing you to go back, or doesnt appear to be working in games, come back here and redo these steps. The buttons usually have values from 95-110, so if you ever see a value like.. 4, then you know that button isnt configured correctly. See table below
Press B to return to previous menu (Input)
Select 'Menu Controls
Toggle 'Menu Swap OK and Cancel Buttons'
Press B to return to previous menu (Input)
20:04
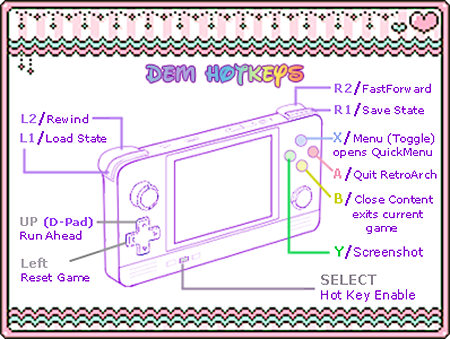
HOT KEYSFrom the Input menu (under Settings)
Select 'HotKeys'(Here you can really see why 1.5 is a little too zoomed in)
Toggle 'Confirm Quit'Select 'HotKey Enable' by pressing A, then press the 'SELECT' button
Follow the directions for Hotkeys actions you want to use (these are little commands like when you press ⌘+C or ⌘+V to copy/paste, where the Control/Command button is SELECT). You dont need to press SELECT again, just press A to select the action, and then the button you want to act as the command trigger.
Make sure you add Menu (Toggle) so you can access the Quick Menu. This Quick Menu is the easiest (if only) way to access console specific options, like changing the color palette for gameboy, which comes up later in the video.
Ive made some adjustments to his hotkey plan, since i dont care much to see the FPS, I changed SEL+Y to take a screenshot, and I changed SEL+B to just exit whatever game Im playing (
Close Content), and then moved Reset Game to SEL+L on the D-Pad:
22:47
Auto Save Game StatusGo into 'Settings' (2nd Column)
Select 'Saving' Toggle 'Load State Automatically' Toggle 'Auto Save State'
23:07
Adding BIOS folderGo into 'Settings'(2nd Column)
Select 'Directory' Select 'System BIOS' Select 'storage/' Select 'sdcard###' Select 'Games/' Select 'BIOS/' Select 'Use This Directory'
23:30
SAVE CONFIGURATION OR ALL WILL BE LOSTReturn to Main Menu (1st Column)
Select 'Configuration File' Select 'Save Current Configuration'
yes, theres still a video and a half to go, but its pretty easy from here on out,
youre more than halfway through, and now its just a matter of adding games and cores.
Take a break if you want, or press on.

 .
. 
home part 2