
I'll be honest with you Im still not completely 100% there with all the BIOS stuff, BUT ive done enough to get every system I want to play working just fine. So you can try and find another source for this stuff, but with the links I have here you'll be set on NES, SNES, Sega Genesis, Sega CD, Game Gear, PS1, PS2, PSP, Dreamcast, Nintendo DS, and all the Gameboys. In fact, more than half the consoles listed dont even need BIOS files, because the emulator already has it baked in.
Do you really need to know what BIOS is? no. it stands for Basic-Input-Output-Something. who cares. What you NEED know is some systems need extra files for their emulators to work, mostly the ones that run CD games (PS, PS2, Dreamcast etc). The reason people add them for other systems is usually so they can see the origina loading screen from the console; for the added charm, i guess.
And I wouldnt have had to write all this if you could just find the files easily, but most legit sites and forums wont link to them because theyre "copywritten material". Luckily for you, im completely illegitamate, and not a coward. just kidding. kind of.

ANYWAY. Here are two popular sites for BIOS, with some caveats:
This was the first one i downloaded from in a rush, and it had everything I needed. However its a little too everything. One of the reasons the Retropacks BIOS dump is so dang big is because it includes an additional compressed folder called mame2003plus.zip (500MB+), that has the emulator core for old stand-up arcade systems, "with an emphasis on high performance and broad compatibility on mobile [and other] devices". I dont think im going to use it, but if youre interested, here are the arcade games it can play
In addition, upon revisiting the site and looking around, it just seems slightly suss. Like, it doesnt seem to be created by actual gamers, or humans for that matter. It's more like an amalgamation of links intended to get people over to amazon and buying stuff through their affiliate links. This was also before I saw the light when it comes to Internet Archive and safety.
That being said, a security check only alerts to a few trackers on the site, that are both google products for running ads, so at least from a security level, a site like buzzfeed is far more menacing than this one.
- size: 719MB (zipped, expands to 1.3GB)
- pros: you'll have everything you need and then some*, simple, drag-n-drop
- cons: massive file, potentially weird site (but i havent noticed anything)
Internet Archive
This is the most recently updated link I have found on archive.org for a RetroArch BIOS Pack. Playstation 2 capability JUST got added this year, so that's why you would want a recent version.
But here's the thing, to make this tutorial I wanted to make sure it would have everything, so i looked through the listed files, and even downloaded it... but I couldnt find those PS2 BIOS files, not all of them at least, and I couldn't find the one that the tutorial marks as the most important. Nor the playstation scph1001.bin file. So if you dont want to play playstation, you dont really need to worry.
In this case, because we are using Internet Archive, we can see the contents of the zip file and cherry pick the files we want, you won't have to download the entire .zip if you don't want to.
If you really want to play PS2 (and PS1) you'll have to use a separate link, and again, you will have to go in and download each file (about 10 total), or, if you know how to use a torrent you can download them all at once, and drag-n-drop.
- size: 346MB (zipped, expands to 983MB); but you can choose to manually download specific files
- pros: safer
- cons: tedious

here is what I can offer you as an alternative:
I've made my own lightweight BIOS Kickstarter Pack (11.8MB) and have uploaded it to the Internet Archive. This will be good enough to get you running everything from NES up to PS2. Ive also included some extra goodies that i saw pop up on a few forums, like the game genie. This option is a lot easier imo, but its far from comprehensive.
Either way, you got the links above, and i'll include instructions on locating the BIOS files you need from both, which should be applicable to any other sources you might want to use.
So here are all your options:
- Retropacks - the shadier site at a larger file size, but easy to drag files from
- Internet Archive - the lighter archive.org link that might be missing stuff & takes a lot of clicking around
- My Retroid BIOS Kickstarter Pack - my much smaller zip file that is far from comprehensive but definitely fine for what you might want to do
- Go look for another BIOS dump yourself.
 here is the list of BIOS files that are recommended
Drag it to your desktop so you have this list handy when youre grabbing files.
(This is a screenshot taken from RetroGameCorp's  Retroid Pocket Starter Guide, so there wouldn't be any mistakes)
 NOTE: you will have to rename the Dreamcast file to "boot.bin"
WHAT YOUR BIOS FOLDER SHOULD LOOK LIKE
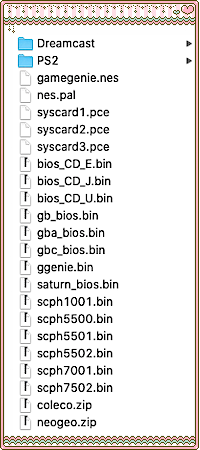
No matter which option you choose, when you're done, your BIOS folder should end up looking something like this, with separate folders for Dreamcast and PS2, and the rest of the other BIOS files chillin together.
(Incidentally, this is the list of files included in my BIOS kickstarter pack, if you choose Option 3.)

OPTION 1
RETROPACKS

Scroll down and click the zip option. you can save it to your desktop or an external harddrive, but dont put it in your BIOS folder, you only want to drag the files youre going to use on your Retroid in that folder. After you unpack/unzip it, theres gonna be a whole mass of files, search around for the files shown in the list you just saved (in the box above with the flashing arrows).

For Dreamcast, make sure you grab the file called "dc_boot.bin", which is in the DC folder
Drag it to a new folder (inside your BIOS folder) named DC or Dreamcast and rename the file to "boot.bin"
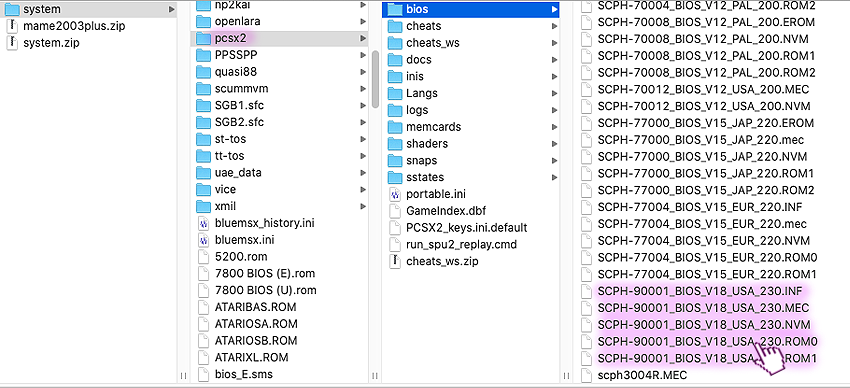
For PS2, look inside the folder called pcsx2, go to bios, and scroll down to the bottom where most of them should be. Make a new folder called PS2 or Playstation2 inside your BIOS folder and drag those inside.
Remember, there is also a .DIFF file with the same name that is on the list, though it may not be 100% crucial, you might as well grab it. Depending on how youre files are organized (view by name, by kind, etc) it might be in a different place in the same pcsx2/bios/ folder.
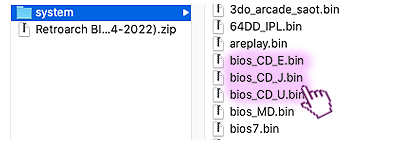
The rest of the files you will be able to find in the main 'system' folder and will go directly into your BIOS folder. The ones shown here are for SegaCD, check through the list to make sure you have all the ones you need/want. And remember not all consoles need bios, like regular Nintendo or N64

OPTION 2
Internet Archive
The following will cover the locations for manual download. If you just want to download the entire thing, youre going to hit ZIP instead of clicking 'Show All' like we usually do, then save it to your desktop or an external harddrive and follow the directions given for option 1
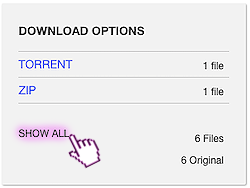
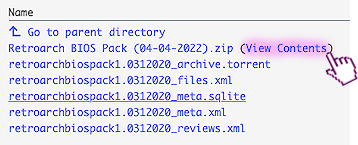
Show all; View contents on the that first zipped item
Because we are looking at all the files with their folder locations in alphabetical order, it can be a little overwhelming at first. you want to focus on the very last part of the filename, that comes after the folder location. Fortunately, most of the ones you need are just "system/file.xxx"
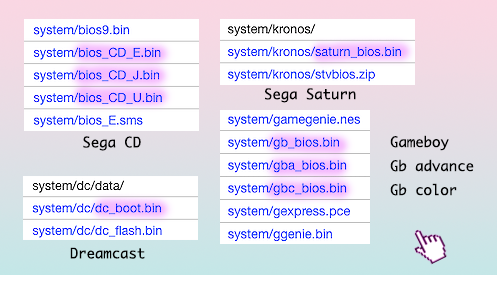
Here are all the files you'll need from this folder; ive included the files that come above and below them, to help u make sure its the right one :)
Save all of these in your BIOS folder, except for the dreamcast one, which will go into its own subfolder (DC/Dreamcast), and rename the file to "boot.bin"

TIP: Try using the Find feature (command+F) in your browser to speed up your process! Also, while you're here you might want to grab those game genie files shown at the top and bottom of the gameboy list if you think you'll want to use them in the future.
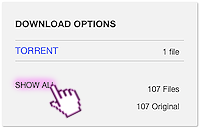
Now click the 2nd link if you would like Playstation BIOS, and click 'Show All'. Here we only have a torrent option- no zip, and youre going to be grabbing like 10 files from here, so if you know how to torrent, it might be best to download it rather than individually saving each one, but i just cant go through all the words to teach that part so, onward ho.
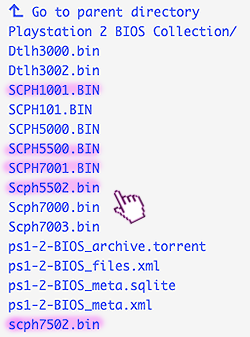
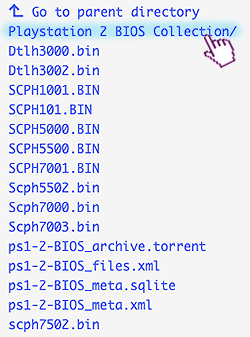
First youre going to grab your PS1 files, some of these were in the first pack, but not all of them, so it was easier just to show everything you need here. When youre done right-click-saving all that (they go into your regular BIOS folder), go to the folder at the top (in blue).
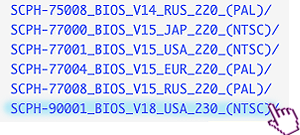
Scroll to the folder at the very bottom with 90001/v18 in the name.
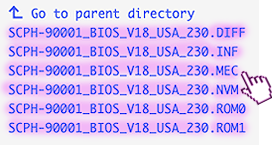
All of them. Except put them in their own subfolder named 'PS2' or 'Playstation2' inside your BIOS.
That's it! you did it! Cry now laugh later!

OPTION 3
My BIOS kickstarter pack
Go to this link on the internet archive. Click ZIP. Save it to your desktop (you dont need an external harddrive- it should be just under 12MB and expand to 29MB). Double-check the contents, and drag the whole shit into your BIOS folder. Ive already created the DC and PS2 subfolders, and renamed the dreamcast file to 'boot.bin'. Done.
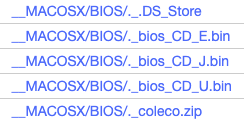
ONE THING THO:
Of course, it can't be that easy.
- If youre on a PC you might notice a bunch of weird ghost files with names like whats shown above that are all 0kb in size. For some stupid reason, MacOSX takes the liberty of creating weird useless parallel copies like the movie Us of every file you compress or transfer files to a PC/Android device. You might want to delete those (they will be in all the subfolders as well), but they dont hurt anything if you miss any, it's just kinda feo.
- If youre on a Mac you might not see them, but this problem could come back up again later when you transfer your files, but we will get into that during configuration.

OPTION 4
You can go your own way
At this point all I can offer you is, use the search term "RetroArch Bios Pack", and take a look at the 11:00min mark during Part 1 of the Retro Corp Retroid 2+ Starter Guide, if you pause there you can see both screens during the transfer and it includes a full view of all the files he's actually using. Oh, and best of luck. You got this.
YOU DID IT!

Or maybe you didnt do it and you just downloaded Option 1 and are going to wait until the day you configure the Retroid. Either way, when the time comes you're going to add these to a folder on your microSD card.

So hopefully this made it less painful. If you do end up using my BIOS pack, and it works, first of all, yay, i didnt make the archive page for no reason. second of all, please consider buying me a cup of coffee? i put so much work into this dumb site, and even though its a lot to read, i tried to make it in the plainest of english, and i hope it saves you some time.


